
C. Teaching Practices
C5. Technology Use
- Technology Use
- Identifying Appropriate Technology
- IDI & Technology Use
- References
Technology Use
For many people, technology changes too fast to keep up. Every institution offers a set of technology tools for instructors. Unfortunately, what each institution offers differs not only in purpose (chat, videoconferencing, etc.), but also in brand (Moodle vs Blackboard vs Canvas…). Where you can get access and support also differs. Technology may be offered at the institution level thru the central IT area, at the college level, and/or at the department level. In addition, many instructors adopt technologies that are not supported by the institute (at any level).
When to consider technology
Almost all courses now have a presence on the institution’s LMS. Often, you can manage a course without additional technologies. However, Miller (2019, pp. 8–9) suggests you look for ‘pinch points’ and ‘bottlenecks’ – activities and/or content that may prove problematic. For these problematic areas, you can brainstorm with support people such as ETs and IDs.
For other activities, consider what you want technology to do to support it. For example, if you have a project for students, a project management tool might be helpful. For providing lecture videos, a video-capture tool or video-conferencing tool might work.
- When determining what pedagogical approach you will use. For example, for courses with at-home lectures, you will need to have access to video capturing equipment, internet, and probably an LMS.
- When determining the spatial and temporal aspects of your course. If your course is synchronous, but remote, will you need to arrange for special classrooms in different locations?
- When determining the types of activities students will complete outside of the classroom. If you expect them to have group meetings but they are geographically diverse, they will all need access to computers, internet, and a meeting system.
- When determining what types of activities students will complete inside the classroom. If they will do group brainstorming, will you want Smartboards for each group?
Types of technology
Consider 3 types of technology:
- Supported technology available from your institute (or college/department) and accessed through a portal (ex.: the LMS such as Moodle, Canvas, etc.)
- Supported technology available from your institute (or college/department) and downloaded to your and/or students’ computer/smart device (ex.: MS Office, Adobe Creative Cloud, etc.)
- Unsupported technology which is not provided by your institute which you want for either your own or for student use (ex.: GroupMe, WordPress, etc.)
Supported technology usually means that in addition to obtaining the technology free (for instructors, not necessarily students), you can get technical support on both installation and problem solving.
Note the difference between technical support and use support – although technical support people can help you install and troubleshoot, sometimes they cannot teach you how to use the technology or discuss best practices.
Many instructors use unsupported technologies such as mobile-phone apps. If you need to look at unsupported technologies, consider also:
- Technical support for accessing, using, and troubleshooting for you and students
- Use support – how do you and students actually use the technology
- Student disability considerations (is the technology accessible?)
- Cost to students in both money and time (access, learn, and use time)
Identifying Appropriate Technology
How To Find What Is Available & What Is Supported
- For each course activity (including assignments and assessments) determine what type of technologies would be appropriate for you and for your students (you may want to list mandatory and nice-to-have separately).
- Start with your department. Ask your department administrative support who they recommend you contact. It could be a departmental, college, or institutional support team/person.
- If your institute has a TLC or an ID team (perhaps in an online learning department), contact them for help.
- If you need further help, ask another instructor what products are available and how they found out about them.
- Check the institution’s IT website. Send a support request (ticket) to the help desk asking for information.
- Check with student disability services for what they offer and support, as well as what they require and recommend for usage.
- For information about technology in a specific classroom, check the facilities management website AND go visit the classroom. Some institutions have lists of room technologies listed in Facilities Management, IT websites, and/or departments, so visiting the classroom is the best way to be certain what is available and what works.
- Each time you find a person who can tell you what is available, ask them who can provide technical and/or use support and their contact information. Keep this list handy.
Always, always, always test all equipment before the course starts!
And make a Plan B.
Selecting Technology
Selecting which technologies will meet your pedagogical needs will depend on the following factors:
- What is available
- What course structure you are selecting
- How much money is at your disposal
- What you can expect your students to pay (technology is usually not included in their student financial packages)
- What kinds of technical support you and your students need
Instructor Technology Use
The most common tools you can expect to find provided by the institute at any level:
- An LMS (such as Moodle, Blackboard, Canvas, and D2L) with scheduling, grading and assignment centers, discussion boards, and online chats.
- Support for video-taping lectures (ranging from studios to loaner equipment).
- Online conferencing for synchronous communications with a class and/or individual student (Collaborate, Zoom, etc.).
- Word processing and similar office tools (Microsoft Office, Google Tools, Adobe Suite, etc.).
Many other technologies may also be available such as smartboards, class computer controls, iOS/android magnifiers, drones, 3D printers, etc. All the available technologies should include technical support. They may not include use support.
Classroom/Online Equipment, Materials, & Technology
The best way to determine what’s available is to test it out before your first class. Visit the classroom and/or LMS. Complete the appropriate worksheets to make sure you have what you need and that you can access and use it:
- 2.2e – Classroom Check
- 2.2g – Synchronous Online Check
- 2.2i – Asynchronous Check
Student Technology Use
Although most students are bringing multiple devices to college now, this does not mean they have unlimited or consistent access to the internet or to a computer. Remember students using online courses may use different technologies than those in the classroom. And on-campus students will have different technologies available than off-campus students.
- View your student demographics to determine if your students have ready access to the internet (is it likely to be limited or unlimited?). This will be needed for:
- The LMS
- Online videos
- Online textbooks
- Software such as MS Office and Adobe Acrobat – these may be downloads or they may require the internet to use them
- Software such as blogs, chats, etc.
- Special software you have selected
- Check with your technology department to determine what is available
- Do your students have free access to word processing (Word, Google Docs, etc.) and, if so, what additional equipment they need to use it (internet and/or computer, etc.).
- If you are requiring reading of Adobe Acrobat articles/books, check if students have free access to Adobe products. Although Acrobat Reader is free, this may not be sufficient for students with no computer or those who want to mark-up the article with highlighting and comments.
- Find locations for computer labs and loaner computers.
- For group work
- Where are smart boards? Ask your technical support where these are and where instructions for use and saving are. Include this in any group activity descriptions.
- What online group technology is available (such as discussion groups, grouped videoconferencing, online smartboards, etc.). Where are instructions and who supports use?
- If your activities require other technologies, check the section below “Resources for Finding Technology”. Remember to determine costs for you and for students to use these before you decide (purchase, rent, support).
- Estimate how much time it will take students to learn how to use the technology. Build this into your homework schedule. In your syllabus, add information about accessing the technology and accessing support.
- Tell your students what is available, where, and what you expect them to use both in and out of class. Remember to put a technology-use statement in your syllabus.
If you select unsupported technology, remember:
- There may be a cost for students, even if there is no cost for you.
- You may need to provide technical support at times you expect students to use it (for example, right before due dates).
Student Technology Use for Online Courses
Although it is tempting to assume that students who enroll in online courses have access to appropriate devices, this may not always be the level of access your course requires.
Examples:
- many online courses have a first requirement that students record a self-introduction using audio and potentially also video
- synchronous class sessions, including group work, require good, consistent internet access
- synchronous lectures may require a good quality speaker or headset and microphone
- participation in synchronous discussions may require a good quality microphone
- students with accessibility needs may require special equipment and different participation methods
- unsupported technology may need to be purchased by students
And for each variation on technology use, students may need technical support. Although students may feel comfortable using various phone apps, this may not translate into confidence in using course-required technologies.
Your institution may offer technologies specifically for online synchronous and asynchronous courses. Most LMSs have built in discussion groups, chats, etc.
In your syllabus, be clear about what uses for each technology you expect and include contact information for technical support (and potentially student affairs for students who have anxiety). If you are using less common technology, such as phone apps, state this in your syllabus and ask students to download it, test access, and use it before the first class in which they will use it.
Student Technology in the Classroom
If you want students to use technology in the classroom, you will need to check what the institution and/or department offer in your specific room(s).
What is available in a classroom may go beyond just a computer. Dr. Regena Scott (R. Scott, personal communication, November 25, 2013) recommends:
- Check with the college to determine if loaner technology is available for students. For a classroom, she recommends at least one computer per group. For many group activities and learning models, students need internet access. When students bring their own devices, they often have problems getting internet or required programs.
- She also likes the capability of sending control of the screen to various tables. She feels that this promotes sharing. This requires an instructor control panel.
- It is critical that the room have the electrical infrastructure to allow every student to plug in his/her device! This may mean bringing extra surge protectors and extension cords. Although you may want to assume student devices have enough battery power, remember that students may have other classes before yours that also require device use.
If you select unsupported technology, consider how the students will access it (including cost), who will provide technical support to students, and who will provide best-use support to students.
Some technologies, such as clickers, may require student licenses (at a cost). Many may also require that students download programs to their own devices. If so, be prepared to help students with this or have help available for the first 2 uses.
If you are using less common technology, such as phone apps, state this in your syllabus and ask students to download it before the first class in which they will use it.
Activities and Apps by Bloom’s Cognitive Levels
Carrington, A. (2016, September 3). The Padagogy Wheel English V5. In Support of Excellence. https://designingoutcomes.com/english-speaking-world-v5-0/. (Carrington, 2016)
Although this primarily provides a list of technologies for completing student activities, it also provides a long list of types of assignments many of which can be completed without technologies. The Padagogy Wheel is sorted by both Bloom’s Cognitive Taxonomy and the SAMR Model.

While the Padagogy Wheel provides a handy verbs and activities list, some people find it difficult for technology selection as the technologies are not directly linked to each activity. For those with a knowledge of the technologies and those who enjoy reviewing various technologies, however, this works well.
For each of the Cognitive and SAMR levels, it provides:
•	A list of action verbs
•	Activities for each level
•	Technologies which may be used by students to complete the activities, with links for each app
Churches, A. (2009). Bloom’s digital taxonomy [PDF]. Retrieved 11/11/2022 from (Churches, 2009) https://louisville.edu/delphi/resources/-/files/resources/pages/Blooms-Digital-Verbs.pdf.
This first lists action verbs for each level of Bloom’s cognitive taxonomy specific to digital learning. It then provides a list of digital tools for each verb. For example, Creating: New Game > Gamemaker, RPGmaker and Evaluating: Report > Word Processing or web published – Report, blog entry, wiki entry, web page, DTP, Presentation, Camera.
Schrock, K. (n.d.). Kathy Schrock’s Guide to Everything. Retrieved September 17, 2022, from https://www.schrockguide.net/. (Schrock, n.d.)
This site provides links to activity descriptions. The Bloomin’ Apps page, while more limited than the Padagogy Wheel, provides more direct ties between activities and apps.

This site provides activities with links to other websites categorized by:
•	Assessment
•	Creativity
•	Devices
•	Emerging Technologies
•	Information/Digital Literacy
•	Pedagogy
•	Professional Growth
This includes a page called Bloomin' Apps, listing activities tied directly to apps, sorted by Bloom’s Cognitive Taxonomy and by iPad, Android, online, and G suite. Six tools are provided for each level for iPad and Android app, and five per level for online and G Suite. Links for each app are provided.

Another page, Activating Strategies for Use in the Classroom, provides 48 strategies with brief descriptions.
Other Lists of Technologies for Learning
Bonk, C., & Khoo, E. (2014). Adding Some TEC-VARIETY: 100+ Activities for Motivating and Retaining Learners Online. CreateSpace Independent Publishing Platform. https://www.academia.edu/8067390/Adding_some_TEC_VARIETY_100_Activities_for_motivating_and_retaining_learners_online.
This free, online book, despite the title, includes activities which can be either online or f2f. A list of appropriate technologies, by category, is included at the end of the book. Note, however, that the book was written in 2014 and technologies may have changed. The activities are arranged in the following categories:
- Tone/Climate: Psychological Safety, Comfort, Sense of Belonging
- Encouragement: Feedback, Responsiveness, Praise, Supports
- Curiosity: Surprise, Intrigue, Unknowns
- Variety: Novelty, Fun, Fantasy
- Autonomy: Choice, Control, Flexibility, Opportunities
- Relevance: Meaningful, Authentic, Interesting
- Interactivity: Collaborative, Team-Based, Community
- Engagement: Effort, Involvement, Investment
- Tension: Challenge, Dissonance, Controversy
- Yielding Products: Goal Driven, Purposeful Vision, Ownership
Each activity includes:
- Description and Purpose of Activity
- Skills and Objectives
- Advice and Ideas
- Variations and Extensions
- Key Instructional Considerations
- Risk
- Time
- Cost
- Learner-centered
- Duration of the learning activity
Hart, J. (n.d.). Top 100 Tools for Learning 2022 – Results of the 16th Annual Survey. Top 100 Tools for Learning. Retrieved September 20, 2022, from https://www.toptools4learning.com/top-tools-by-category/. (Hart, n.d.)
An annually updated list of technologies based on over 1,700 votes in an open survey. Selecting a tool displays a page listing the voters’ comments, a Quick Guide list of YouTube videos, and other resources. The tools are categorized in several ways:
Main context:
•	Personal learning
•	Workplace learning
•	Education
Key ways of learning
•	Didactics
•	Discourse
•	Doing
•	Discovery”
Category:
•	Office Tools & Suites
•	Content Development
•	Learning Tools & Platforms
•	Social & Collaboration Platforms
•	Web Tools & Platforms
IDI & Technology Use
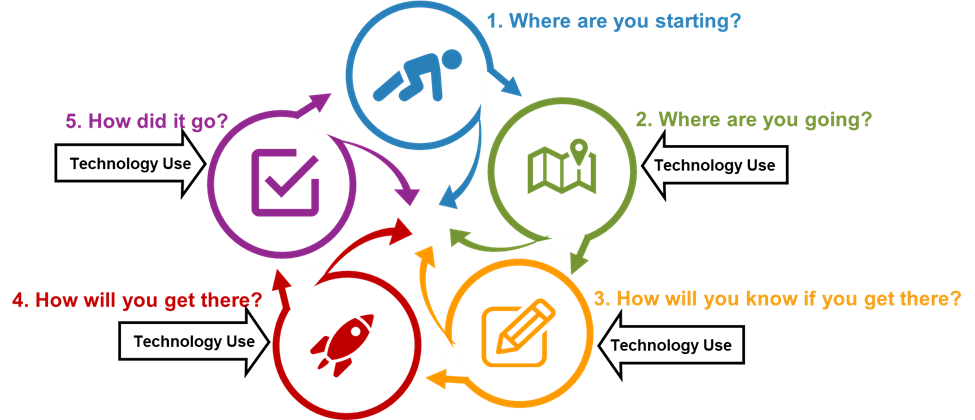
The following describe actions you can take to use concepts from Technology Use in the IDI model:
Step 2. Where are You Going?
2.2 Finalize Learning Model
- Identify if you have a required learning structure. If so, identify what technology is required for this.
- Find out what technology is available.
- Identify an initial list of technology you and your students will use.
- Identify what training you and your students might need to access and use the technology
- Identify any student disability support services might be available
- Identify what support teams (IDs, ETs, etc.) might be available to support you and your students and what types of support they will provide
- Identify what technology might be available in assigned rooms.
Step 3. How Will You Know If You Get There?
3.1 Develop Assessments & Rubrics
- For each course activity (including assignments and assessments) determine what type of technologies would be appropriate for you and for your students (you may want to list mandatory and nice-to-have separately).
- If you have assignments and activities already identified, add these to the syllabus and indicate required equipment and technologies and student expectations for use, such as:
- Technical and use support
- Costs
- Equipment (computers, phones, headsets, etc.)
3.2 Develop Instruments to Evaluate the Course
- Consider asking students for feedback on how the technology impacted their ability to learn the content, communicate with you, or work with other students.
Step 4. How Will You Get There?
4.1 Develop & Teach Course
- Check into all technology you may use to ensure it works and you know how to use it.
- For each course activity (including assignments and assessments) determine what type of technologies would be appropriate for you and for your students (you may want to list mandatory and nice-to-have separately).
- Consider the support of technology before deciding if you will use it.
- In your syllabus, indicate required technologies and student expectations for use
- Technical and use support
- Costs
- Equipment (computers, phones, headsets, etc.)
- In course materials, be sure to indicate what technologies must be used and what is optional..
- Consider adding (again) what supports are available for technology use..
- As you are teaching you will sometimes find a technology is not working as anticipated. Move to Plan B and apologize to students if they are confused or redirected.
4.2 Assess Students
- When students need to use technology for anything that may impact their grade, check with the students on whether they were negatively impacted. For example, on tests, add a question such as “Did Moodle impact your ability to complete this test? If yes, how? What could you have done differently? What should I have done differently?”
Step 5. How Did It Go?
5.1 Evaluate Course Success
- At the end of each session and at the end of the course, note what technologies you used, how it went, and what you should know for next time.
References
Bonk, C., & Khoo, E. (2014). Adding Some TEC-VARIETY: 100+ Activities for Motivating and Retaining Learners Online. CreateSpace Independent Publishing Platform. https://www.academia.edu/8067390/Adding_some_TEC_VARIETY_100_Activities_for_motivating_and_retaining_learners_online.
Carrington, A. (2016, September 3). The Padagogy Wheel English V5. In Support of Excellence. https://designingoutcomes.com/english-speaking-world-v5-0/
Churches, A. (2009). Bloom’s Digital Taxonomy v3.01.pdf. Educational Origami. http://edorigami.wikispaces.com/file/view/bloom%27s+Digital+taxonomy+v3.01.pdf
Hart, J. (n.d.). Top 100 Tools for Learning 2022 – Results of the 16th Annual Survey. Top 100 Tools for Learning. Retrieved September 20, 2022, from https://www.toptools4learning.com/top-tools-by-category/.
Miller, M. D. (2019, August 23). How to Make Smart Choices About Tech for Your Course. The Chronicle of Higher Education. https://www.chronicle.com/article/how-to-make-smart-choices-about-tech-for-your-course/.
Schrock, K. (n.d.). Kathy Schrock’s Guide to Everything. Kathy Schrock’s Guide to Everything. Retrieved September 17, 2022, from https://www.schrockguide.net/